PKT How to: install WSL & compile the miner
(last update:26 January 2022)
(last update:26 January 2022)
Trade $PKT on Bittrex (click here) or BitMart (click here)
PKT Miner: https://github.com/cjdelisle/packetcrypt_rs
PKT Cash website: https://pkt.cash
PKT Discord: https://discord.gg/nPmBHFKWV2
My custom compiled miner: https://github.com/SiemdeNijs/packetcrypt_rs_SNcomp
Does traditional $PKT mining sound too difficult, but don't wanna miss out ?:
Check out PKT Pal and use the coupon "sn100off"
update 15-03-2022:
$PKT Will now be trading on Bittrex Global. If you wish to register, it'd be kind if you use this link, thanks: https://bittrex.com/discover/join
$PKT Will now be trading on Bittrex Global. If you wish to register, it'd be kind if you use this link, thanks: https://bittrex.com/discover/join
update 10-02-2022:
SNautocomp now does the work for you
If you still wish to self-compile the miner, follow the steps below to install WSL and then follow this one-command tutorial to use SNautocomp, it'll automatically preform all the needed tasks for you:
https://github.com/SiemdeNijs/packetcrypt_rs_SNcomp/wiki/
SNautocomp now does the work for you
If you still wish to self-compile the miner, follow the steps below to install WSL and then follow this one-command tutorial to use SNautocomp, it'll automatically preform all the needed tasks for you:
https://github.com/SiemdeNijs/packetcrypt_rs_SNcomp/wiki/
update 30-01-2022:
SNCOMP FOR THE BEST PERFORMANCE
I have compiled a custom miner which could potentially further improve performance, without having to self compile. I'm using a completely different method than described / mentioned on the official GitHub, to achieve even better performance. You can follow along to this guide to ONLY install WSL, and ignore the part about self-compiling when you get my custom precompiled miner from here: https://github.com/SiemdeNijs/packetcrypt_rs_SNcomp
Why to run the miner on WSL ? Why to compile the miner yourself ?

It all comes down to performance improvements. At the time of writing several community members have reported improved performance when mining PKT Cash on the Windows Subsystem for Linux as oppose to mining it directly on the Windows host. This alone -mining with WSL- can bring significant improvements. However, the real fun begins when we compile the miner ourselves. This again, can improve performance.
To top it off, we can compile the miner with a special flag ('jemalloc' GitHub), which may again bring performance increasements, and is said to have positive effects on memory management.
And finally, if compiled with clang as well, the community again reports increased performance.
To top it off, we can compile the miner with a special flag ('jemalloc' GitHub), which may again bring performance increasements, and is said to have positive effects on memory management.
And finally, if compiled with clang as well, the community again reports increased performance.
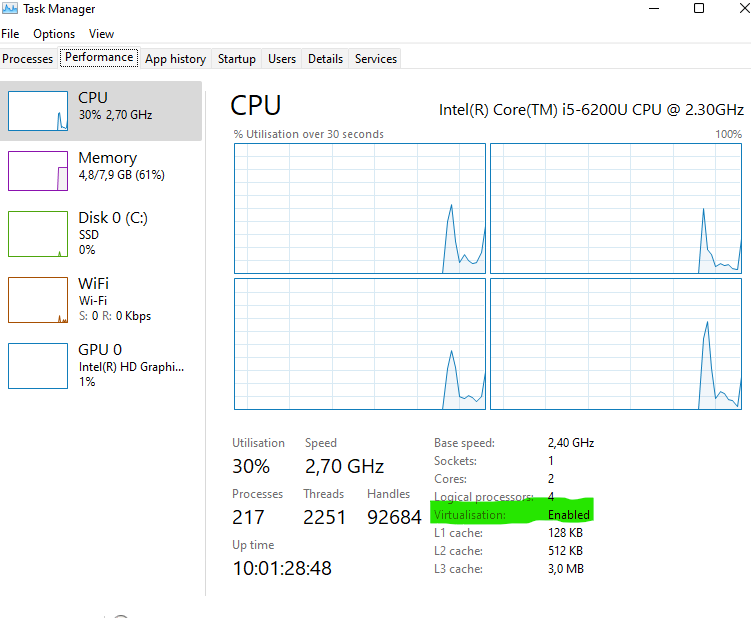
Check system compatibility
To start it off we'll check if our system is actually capable of virtualization.
Hit the keys CTRL + SHIFT + ESC simultaneously and Task Manager will show up. When we head over to the "Performance" tab, and select our CPU, we can see whether Virtualization is enabled, or disabled.
Hit the keys CTRL + SHIFT + ESC simultaneously and Task Manager will show up. When we head over to the "Performance" tab, and select our CPU, we can see whether Virtualization is enabled, or disabled.
(highlighted green on the image). If its enabled, you can proceed to the next step already.
Otherwise, it's wise to check if your system is capable of virtualization at all. If it is, and appears to be "disabled", try a web-search on how to enable virtualization in your BIOS for your corresponding hardware.
Run powershell as administrator
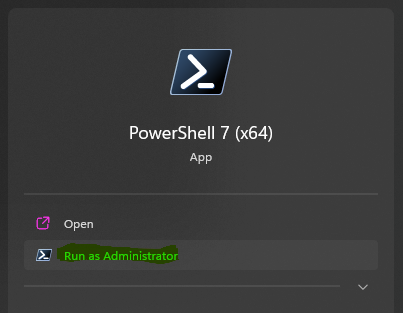
Head over to the start menu or search, and type powershell, be sure to right click it and run it as administrator, Alternatively: find the option when hovering over the app in the Start Menu, as on the image
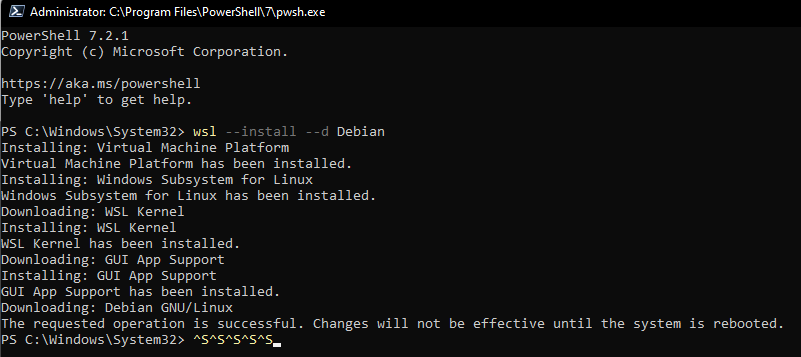
Install WSL, Debian Distro
To get started, we'll first have to install the Windows Subsystem for Linux. We can chose which distro we want to install. In this case we'll use Debian. As I made this how to using WSL Debian, I'd advise you to do the same if you wish to follow along. To get started, copy & paste or type the following into your powershell:
wsl --install --d Debian
A successful installation should produce similar output as shown on the image.
Time for the next step.
Time for the next step.
Once that's done reboot your system & wait.
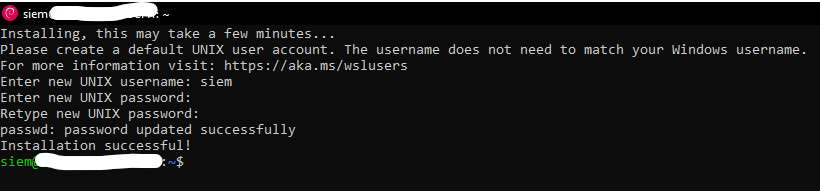
As your system boots again, you'll probably notice something popping up, as shown on the image. That's WSL Debian, running for the first time. Wait till you're prompted to pick a username and password. Pick any username, hit enter. Any password, confirm, hit enter. Remember your details. Once you've done that, it should show a message "Installation successful!" as on the image. If so, it's time for the next step.
UPDATE:
YOU DO NOT HAVE TO FOLLOW THE STEPS AFTER THIS ANYMORE. YOU CAN USE SNAUTOCOMPILE, WHICH WILL DO ALL THE WORK FOR YOU:
https://github.com/SiemdeNijs/packetcrypt_rs_SNcomp-instructionsforsnautocomp-
YOU DO NOT HAVE TO FOLLOW THE STEPS AFTER THIS ANYMORE. YOU CAN USE SNAUTOCOMPILE, WHICH WILL DO ALL THE WORK FOR YOU:
https://github.com/SiemdeNijs/packetcrypt_rs_SNcomp-instructionsforsnautocomp-
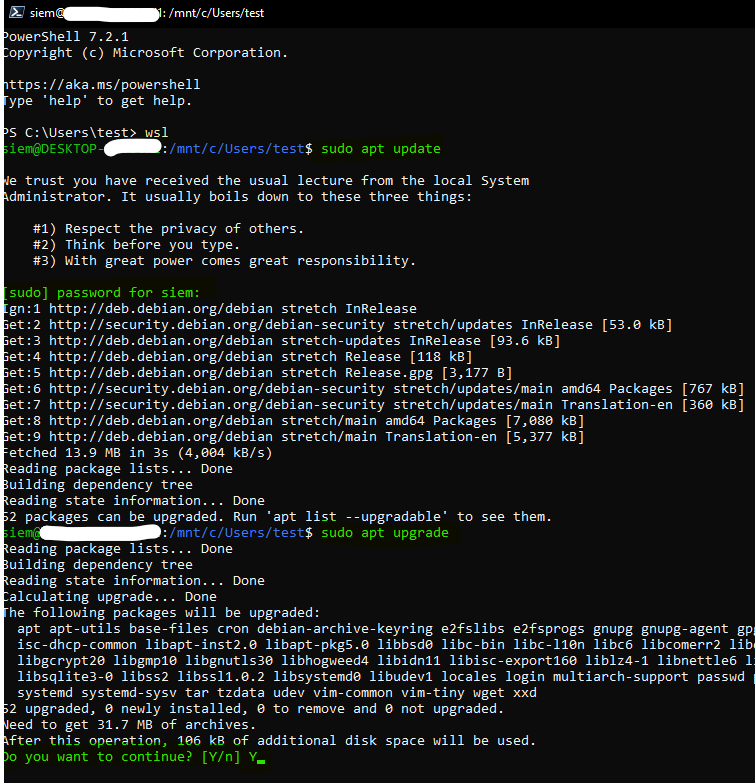
First, lets update
If you're not inside the WSL shell, type "wsl" into powershell and enter your chosen password. As on the image "ChosenUsername@PCName:/work/folder$"
shows us we're inside the shell, as which user & our current working directory.
Before we do anything else, it's smart to ensure all our packages, dependencies, etc. which the distro came with are up to date. To do so, simply copy & paste or type the following commands in the WSL Shell:
shows us we're inside the shell, as which user & our current working directory.
Before we do anything else, it's smart to ensure all our packages, dependencies, etc. which the distro came with are up to date. To do so, simply copy & paste or type the following commands in the WSL Shell:
sudo apt update && sudo apt upgrade
once you run this, you will be prompted with the question shown at the bottom of the image, highlighted. Enter "Y" when asked if you want to continue (upgrading) and hit enter to proceed. Once it's done, you can continue to the next step.
Install required packages
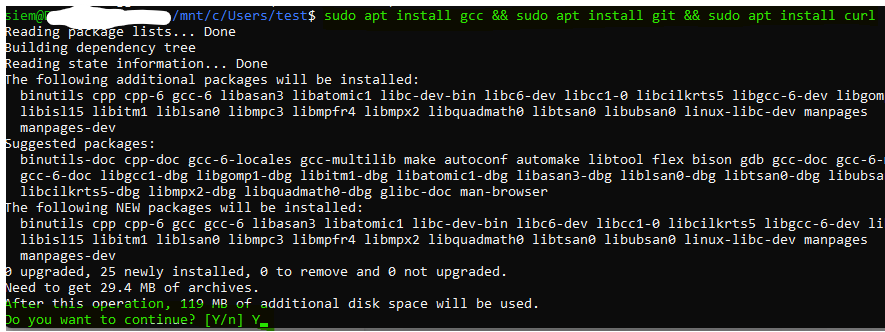
We will need to install a few packages before we can continue. Copy & paste or type the following:
sudo apt install gcc && sudo apt install git && sudo apt install curl
These are required for the upcoming steps. When prompted enter your password, "Y" to continue the installation. Once done, continue to the next step.
Install rustup
We will need to install rust. Luckily, rustup makes this process a lot easier.
Copy & paste or type the following:
curl --proto '=https' --tlsv1.2 -sSf https://sh.rustup.rs | sh
It will download the script and run it for us, when prompted as on the image chose option 1 to proceed with the installation with the current options. When it's done installing, type "exit". You will now be back in powershell. Type "wsl --shutdown".
Wait a second, and type "wsl" to go back into the WSL shell & proceed to the next step.

Install make, build-essential and clone the repo
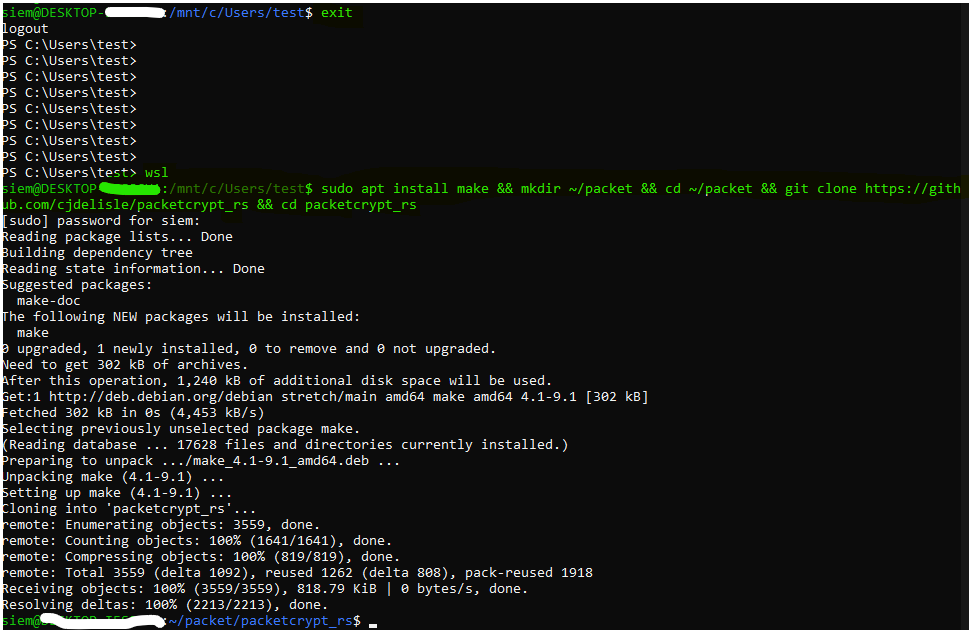
We will need to install make and clone the repo. Copy & paste or type the following:
sudo apt install make && sudo apt install build-essential && mkdir ~/packet && cd ~/packet && git clone https://github.com/cjdelisle/packetcrypt_rs && cd packetcrypt_rs
sudo apt install make && sudo apt install build-essential && mkdir ~/packet && cd ~/packet && git clone https://github.com/cjdelisle/packetcrypt_rs && cd packetcrypt_rs
It will install make, when prompted proceed with the installation. Then it will create a folder, and clone the GitHub packetcrypt_rs repo. Lastly it'll navigate to this folder. When this is all done, continue to the next step.
Install clang
Now, lets install clang. Copy & paste or type the following:
sudo apt install clang-11
When prompted enter your password & "Y" to continue.
Once complete, continue to the next step.
Once complete, continue to the next step.

And finally, lets build

Before we proceed with the build, it's advised to once again type "exit" into the WSL shell. Next, back in powershell, type "wsl --shutdown" and wait a moment. After this, type "wsl" to return to the WSL shell.
Then now, let's build. Copy & paste the following into your WSL shell:
cd ~/packet/packetcrypt_rs && CC=clang-11 ~/.cargo/bin/cargo build --release --features jemalloc
This process may take some time. Once done, continue to the last steps.
If you encounter any errors during this process it's advised to seek support in the PKT Community.
If you encounter any errors during this process it's advised to seek support in the PKT Community.
Done building ?
Hopefully you will receive similar output as on the image, meaning it has successfully finished building.
If so, let's try it out !
If so, let's try it out !

Test the compiled miner
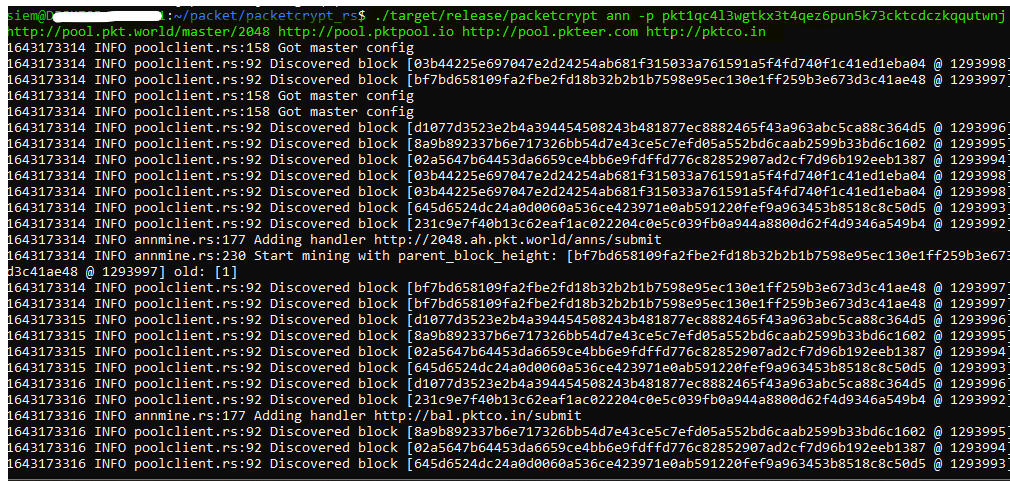
Before we continue it's best to see if our compiled miner is working correctly. Copy & paste or type the following:
./target/release/packetcrypt ann -p pkt1qc4l3wgtkx3t4qez6pun5k73cktcdczkqqutwnj http://pool.pkt.world http://pool.pktpool.io http://pool.pkteer.com http://pktco.in
[*replace this address with your PKT address*]
./target/release/packetcrypt ann -p pkt1qc4l3wgtkx3t4qez6pun5k73cktcdczkqqutwnj http://pool.pkt.world http://pool.pktpool.io http://pool.pkteer.com http://pktco.in
[*replace this address with your PKT address*]
This command runs the miner we've compiled, with our specified address on several 2048-capable pools.
If it runs successfully, the output should be similar as on the image. It's advised once you're actively going to use it to keep an eye on it, check the good rates and more.
If it runs successfully, the output should be similar as on the image. It's advised once you're actively going to use it to keep an eye on it, check the good rates and more.
Hit the keys CTRL + C simultaneously and stop the miner for now. Then proceed to the next step
For ease of access, copy the miner
Let's make life a little easier. The miner currently resides in a directory inside a directory inside a...
So let's copy it to a general place for easy access. Copy & paste or type the following:
sudo cp ~/packet/packetcrypt_rs/target/release/packetcrypt ~/
All this command does it copy the miner instance to a more general location, "~/". We're almost done.

Exit WSL

Now that we've got it all done, type "exit" into the wsl shell. Why ? Because we can actually start the miner, without first having to be inside the wsl shell. This can be done within one command. Copy & paste or type:
wsl ~/packetcrypt ann -p pkt1qc4l3wgtkx3t4qez6pun5k73cktcdczkqqutwnj http://pool.pkt.world http://pool.pktpool.io http://pool.pkteer.com http://pktco.in
[*replace this address with your PKT address*]
[*replace this address with your PKT address*]
Thanks to us copying the file, we don't have messy folder structure when we run this command. When we want to mine, we can simply run this command.
That was it ! but... there is one, just one last step.
That was it ! but... there is one, just one last step.
And finally lets make life easier, with a bat file
Yes, we can run the command ourselves. But why not make it a click-away ?
Open notepad and simply copy & paste or type the following in an empty file:
Open notepad and simply copy & paste or type the following in an empty file:
wsl ~/packetcrypt ann -p pkt1qc4l3wgtkx3t4qez6pun5k73cktcdczkqqutwnj http://pool.pkt.world http://pool.pktpool.io http://pool.pkteer.com http://pktco.in
[*replace this address with your PKT address*]
[*replace this address with your PKT address*]
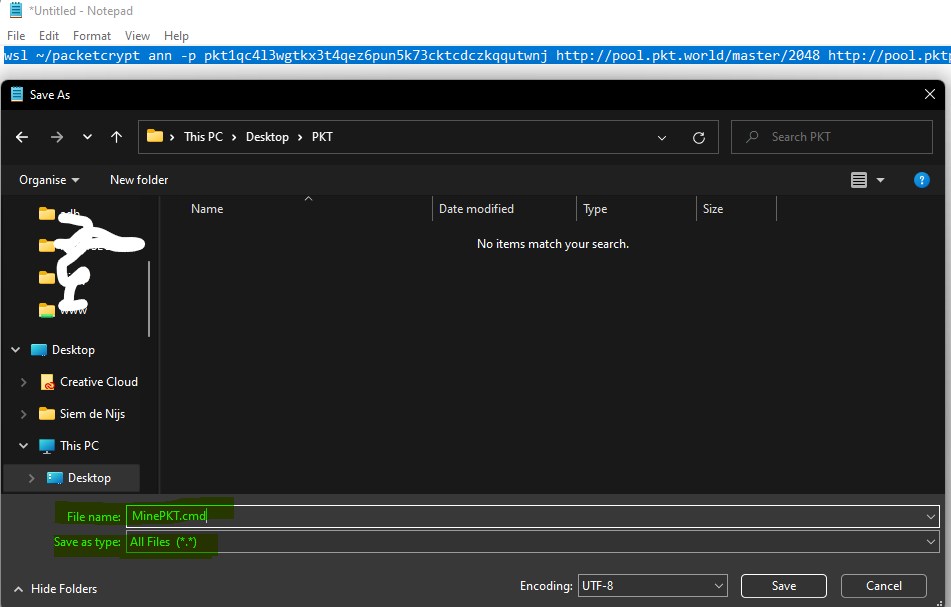
Next, simply hit save as. Next, as highlighted on the image, under "Save as type" select the option "All files". Name the file whatever you want, but be sure to end it with ".CMD".
Save it, click it, and voila.
I genuinely hope you as a reader, PKT Community member, (and possible miner) will benefit from this walk through & from mining on WSL, with your freshly compiled miner. Hope to see you all around in the community Discord.
If you're feeling kind or helped by my efforts to increase your PKT yield...
PKT: pkt1qc4l3wgtkx3t4qez6pun5k73cktcdczkqqutwnj
PayPal: https://PayPal.me/SiemdeNijs
-Siem de Nijs
PKT: pkt1qc4l3wgtkx3t4qez6pun5k73cktcdczkqqutwnj
PayPal: https://PayPal.me/SiemdeNijs
-Siem de Nijs